All 39 Bosses in Phantom Blade Zero, in Order
The story-order list, the 24 optional fights, and why the count is 39, 50+ or 74.
Two prologue fights, two health bars, one rule: break the guard before you chase damage. Here is every tell, both HP values, and why neither fight gives you a results screen.
Zuo Shang is where Phantom Blade Zero stops being a tutorial. The game has already shown you how to move, dodge and swing; now it puts a health bar on the screen and asks whether you were paying attention. The answer is not more attacks. It is guard damage, a half-second parry rhythm, and knowing which red flash means "do not block."
Boss order: Zuo Shang occupies entries 1 and 2 in our full list of all 39 bosses. The carriage fight against The Hunt comes immediately after.
Both encounters sit in the prologue chapter, "Diverging Paths." You do not need a quest, an item or a side objective to start them. A new game drops you into the tutorial, and once the movement and combat lessons are done, the first fight begins on its own.
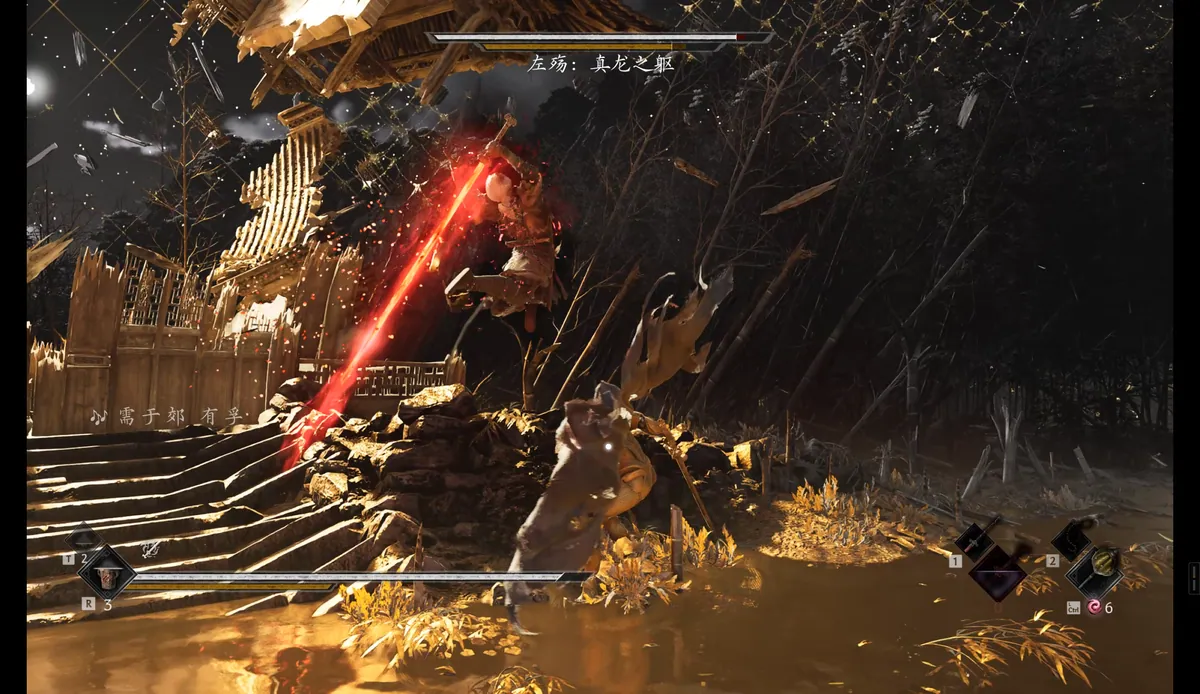
The first arena is a bamboo-lined stone yard with a small pavilion. The story cuts back sixteen years to a younger Soul, which is why this version of Zuo Shang feels like a teacher rather than a wall. The second fight comes later in the same prologue, at night and in the rain, on a battlefield planted with spears and banners. The mood changes, but the lesson does not: drain the guard, punish the break, and dodge anything outlined in red.
One location note: the sources associate Zuo Shang with Weeping Creek Valley, but you fight him before that region opens. Treat the valley tag as story context, not a route you need to walk.
The two fights are separate encounters with separate bars. Neither one ends because the bar reaches zero in the ordinary way.
| Fight | Health bar | HP (Pathbreaker) | How it ends | Reward |
|---|---|---|---|---|
| First, the sparring match | Zuo Shang | 2,900 | Cutscene at low health | None |
| Second, the night duel | Zuo Shang, the Order's Shadow Sovereign | 8,000 | Cutscene before the bar empties | None |
Health values are identical on Pathbreaker and Wayfarer. Difficulty does not touch the bars.
That last point matters more than it sounds. Wayfarer makes the fight easier, but not by shortening it: incoming damage drops to 70%, Sha-Chi costs drop to a third, and the parry window gets wider. Zuo Shang still has the same 2,900 and 8,000 HP, so the fight still takes the same number of guard breaks. If you are stuck, the difficulty setting buys you more mistakes per attempt, not a shorter health bar.
Both encounters also end in a cutscene instead of a results screen. In the first fight, the scene triggers while his health is still low. In the second, the scene begins before the bar is empty. If you are waiting for a reward screen, stop: the cutscene is the victory state, and there is nothing to pick up.
The first fight gives you four moves and plenty of room to learn them. The second reuses the same grammar with heavier punctuation: wider swings, a spin that leaves a red circle on the floor, and close-range red flashes that punish greedy combos. The colour rule behind every answer below is the same one used across the game, and the parry timing guide explains it in detail.
| Attack | Tell | Answer |
|---|---|---|
| Forward lunge | No red flash | Parry or dodge |
| Red-flash thrust | Red horizontal streak | Dodge only, with Left Shift by default |
| Leaping flying kick | No red flash | Parry or dodge |
| Low sweep | No red flash | Parry or dodge |
| Attack | Tell | Answer |
|---|---|---|
| Golden sweeping slash | Wide golden arc | Back off or dodge, then punish the recovery |
| Heavy strikes | Ordinary heavy swing | Parry; a clean parry throws red sparks |
| Red-flash spin | Red circle under his feet | Walk out of the circle; do not block |
| Close-range red-flash strikes | Red flash at close range | Dodge with Left Shift |
Per-attack damage values and the exact health threshold that triggers each ending cutscene are not in the sources we checked, so they are left unlisted instead of estimated. Default controller bindings are also unconfirmed; the inputs on this page are the keyboard defaults.
Both fights run on the same engine: guard damage first, health damage second. Zuo Shang's guard is the real progress bar. Chip it with Sha-Chi combos and successful parries, then unload when it breaks. The loop below is the whole fight in six steps.
Use F F F, or a light attack followed by F F. The combo drains his guard and sets the pace; both fights reward pressure over waiting.
Press the parry once as each hit lands, roughly every 0.5 seconds. Mashing does not register as a parry and leaves you open.
When the guard bar empties, Zuo Shang is Guard-Broken. Most of his health disappears in these windows, so spend them on full combos rather than one safe hit.
A red flash means the attack cannot be blocked or parried. Dodge with Left Shift by default; in the second fight, walk out of the red circle before it closes.
Use Q for Power Surge when you have Sha-Chi Essence. Heal with R below roughly 40% health, and closer to one third in the second fight, because his pressure punishes panic heals.
Do not wait for a results screen. The first fight ends in a cutscene when his health is low; the second ends before the bar is empty. The cutscene is the win.
This is the cleaner of the two fights, and the one to use for practice. Stay close enough to threaten the Sha-Chi combo, but do not hold forward. The forward lunge, the flying kick and the low sweep are all parryable, and each parry chips the guard while giving you back the initiative. The red-flash thrust is the exception: it exists to teach you that not every attack has the same answer. Dodge it with Left Shift and resume pressure.
When the guard breaks, do not get creative. A full punish string is worth more than a single heavy attack, and the 2,900 HP bar means two or three clean breaks will take you to the cutscene. If you take a hit, keep going rather than backing off to heal at full health; the fight is short enough that a reset costs more than it saves.
The rain fight adds reach and removes patience. The golden sweeping slash covers a wide arc, so backing straight up is how you eat the follow-up. Dodge through the swing or step out of range, then take the recovery. Heavy strikes are your parry targets; the red sparks are the confirmation that the timing landed.
The red-flash spin is the move that kills runs. The circle appears under his feet, and blocking is not an answer. Walk out of the circle, then re-enter after the spin finishes. The close-range red flashes punish anyone who treats a guard break as an invitation to keep mashing; finish your punish, then reset your feet.
The opening prompt in this fight explicitly asks you to use combos to break his guard, so trust the system rather than chasing raw damage. With 8,000 HP, you will need several breaks. Heal below roughly a third of your health, but only after a long attack has finished, and keep Q for Power Surge when you have the essence to spend.
Use this table mid-fight. Each row is a single read and a single answer, drawn from the move tables above.
| If you see | Do this | Why |
|---|---|---|
| Red flash or a red circle under his feet | Dodge with Left Shift; walk out of the circle first | Red attacks cannot be blocked or parried |
| A blue flash closing a long combo | Parry on the flash, once | Blue is the parry colour; the source that describes this timing calls it the end of a seven-hit string |
| His guard bar is empty | Land a full combo instead of one heavy | Guard-broken windows remove most of his health |
| The guard bar is barely moving | Open with the Sha-Chi combo (F F F) |
Guard damage is the progress bar, not raw health damage |
| You are below roughly 40% (first fight) or one third (second fight) | Heal with R after a long attack finishes |
Panic heals during pressure get punished |
| The golden sweeping slash starts | Dodge through it or step out of range, then punish the recovery | Backing straight up walks into the follow-up |
| His health is low but nothing happens | Keep attacking until the cutscene plays | Both fights end in a cutscene, not a results screen |
Every one of these comes from a rule already stated above, and each costs more than it looks like it does.
One source (games.gg) describes this fight as blocking flying swords and dodging a final flying mace, with the key timing described as the blue flash at the end of a seven-hit combo. The move list we used for this page (AllThingsHow) records a lunge, a red-flash thrust, a flying kick and a low sweep instead, and does not mention flying swords or a mace.
We have kept the two descriptions separate rather than blending them into one imaginary moveset. If you see flying weapons in your build, treat that report as a different observation of the same encounter, and trust the colour rule over the weapon: red means dodge, blue means parry.
Nothing drops. No weapon, no Remnant Dust, no results screen. The first fight hands you a cutscene and a story beat; the second does the same. That is not a bug or a missed pickup, and there is no hidden chest behind the arena.
What you actually gain is the next fight. The prologue continues into the carriage encounter with The Hunt, which uses the same first health bar but a much shorter lesson. If you can break Zuo Shang's guard without panicking, you already have the habit that carries you through the rest of the opening region.
Twice, both in the prologue: a 2,900 HP sparring match in a bamboo courtyard, then an 8,000 HP night fight against Zuo Shang, the Order's Shadow Sovereign.
Both encounters end in a cutscene. The first triggers when his health is low; the second ends before the bar is empty. There is no results screen and no drop, so the cutscene is the win.
No. His 2,900 and 8,000 HP are the same on Pathbreaker and Wayfarer. Wayfarer only reduces the damage you take to 70%, cuts Sha-Chi costs to a third, and widens the parry window.
No. Red-flash thrusts, spins and close-range strikes have to be dodged, with Left Shift by default. Parry the normal tells instead: the lunge, the flying kick and the low sweep in the first fight, and the heavy strikes in the second.
About one parry every half second. Mashing the button does not register as a parry, so wait for the hit and press once.
No weapon, no Remnant Dust and no results screen. The reward is progression: the prologue continues into The Hunt's carriage fight.
Where the sources describe the same fight differently, the page says so rather than merging the details into a single unverified move list.
Data is based on the current version of Phantom Blade Zero. Last updated . Spotted something out of date? Tell us with a screenshot and we will re-test it.
Keep going
The story-order list, the 24 optional fights, and why the count is 39, 50+ or 74.
The Great Waterfall route, both health bars and the 15 m chain.
The first open-area fight: six tells, the add clear and the 8,280 HP bar.
The three systems everything else builds on, explained without story spoilers.